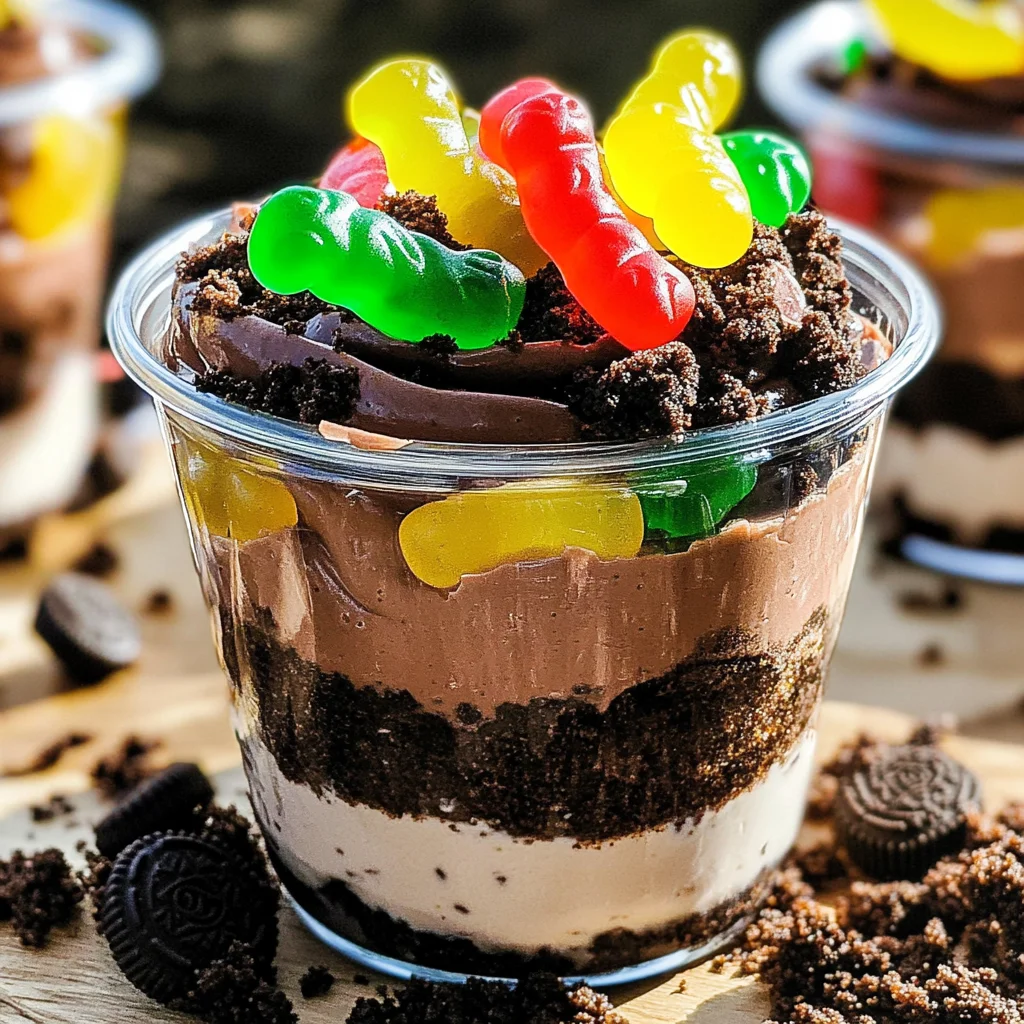
Dirt Cups are a fun and delicious dessert that everyone will love! These delightful treats feature layers of creamy chocolate pudding, crushed Oreo cookies, and vibrant pectin-based gummy candies. Perfect for parties, family gatherings, or just a sweet snack, Dirt Cups are as easy to make as they are enjoyable to eat. Their unique combination of textures and flavors will surely impress both kids and adults alike!

Jump to:
- Why You’ll Love This Recipe
- Tools and Preparation
- Essential Tools and Equipment
- Importance of Each Tool
- Ingredients
- For the Pudding
- For the Toppings
- How to Make Dirt Cups
- Step 1: Prepare the Pudding
- Step 2: Combine with Whipped Topping
- Step 3: Assemble the Cups
- Step 4: Chill Before Serving
- How to Serve Dirt Cups
- For Kids’ Birthday Parties
- As Halloween Treats
- At Family Gatherings
- For Movie Nights
- How to Perfect Dirt Cups
- Best Side Dishes for Dirt Cups
- Common Mistakes to Avoid
- Storage & Reheating Instructions
- Refrigerator Storage
- Freezing Dirt Cups
- Reheating Dirt Cups
- Frequently Asked Questions
- What are Dirt Cups?
- How long do Dirt Cups last?
- Can I customize my Dirt Cups?
- Are there any alternatives for allergies?
- What occasions are best for serving Dirt Cups?
- Final Thoughts
- 📖 Recipe Card
Why You’ll Love This Recipe
- Quick and Easy: With minimal ingredients and simple steps, you can whip up these delightful cups in no time.
- Fun Presentation: The layered look of Dirt Cups makes them visually appealing, perfect for any occasion.
- Versatile Flavor: You can easily customize the toppings or add different flavors to suit your taste.
- Kid-Friendly: This recipe is perfect for kids’ parties or as a fun family activity in the kitchen.
- No-Bake Delight: Enjoy the convenience of a dessert that requires no baking, saving you time and effort.
Tools and Preparation
Before starting your Dirt Cups, gather your essential tools. These will help streamline your preparation process and ensure your dessert turns out perfectly.
Essential Tools and Equipment
- Mixing bowl
- Whisk
- Measuring cups
- Glasses or cups for serving
- Spoon
Importance of Each Tool
- Mixing bowl: A good mixing bowl allows for easy mixing of ingredients without spills.
- Whisk: A whisk helps achieve a smooth consistency in your pudding mix by thoroughly combining all components.
Ingredients
Layers of chocolate pudding, crushed Oreos topped with pectin-based gummy candies!
For the Pudding
- 3.4 ounces box instant chocolate pudding mix
- 2 cups milk
- 8 ounces whipped topping (thawed)
For the Toppings
- 10-12 Oreo cookies (crushed)
- 32 pectin-based gummy candies
How to Make Dirt Cups
Step 1: Prepare the Pudding
- In a medium bowl, add cold milk and sprinkle the pudding mix over the top.
- Whisk until well combined.
- Let sit for 5 minutes to thicken.
Step 2: Combine with Whipped Topping
- Gently fold in the thawed whipped topping until fully integrated.
Step 3: Assemble the Cups
- Spoon the pudding mixture into glasses or cups.
- Sprinkle crushed Oreo cookies on top of each cup of pudding.
- Add 4 pectin-based gummy candies on top of each cup.
Step 4: Chill Before Serving
- Chill until ready to serve for best flavor and texture.
Servings: 8
Prep Time: 10 minutes
Cook Time: 30 minutes
Total Time: 40 minutes
Course: Dessert
Cuisine: American
Keywords: Dirt Cups
Enjoy these delightful Dirt Cups at your next gathering!
How to Serve Dirt Cups
Dirt Cups are a fun and creative dessert that’s perfect for any occasion. They can be served in individual cups or glasses, making them ideal for parties and gatherings. Here are some serving suggestions to elevate your Dirt Cups experience.
For Kids’ Birthday Parties
- Colorful Straws: Add colorful straws to each cup for a festive look that kids will love.
- Themed Decorations: Use themed decorations like mini toy trucks or bugs on top of the cups to match your party theme.
As Halloween Treats
- Gummy Worms: Place gummy worms on top of the Dirt Cups for a spooky effect that fits perfectly with Halloween.
- Chocolate Spider Webs: Drizzle melted chocolate over the cups to create spider web designs for a creepy yet delicious touch.
At Family Gatherings
- Layered Presentation: Serve the dirt cups in clear glass bowls or dessert jars to showcase the beautiful layers.
- Personalized Toppings: Offer a variety of toppings like sprinkles or crushed nuts so guests can customize their own Dirt Cups.
For Movie Nights
- Mini Serving Sizes: Serve smaller portions in shot glasses for easy handling while enjoying a film.
- Cocoa Dusting: Lightly dust the top with cocoa powder for an extra touch of chocolate flavor.
How to Perfect Dirt Cups
Creating the ultimate Dirt Cups involves a few simple tricks. Follow these tips to ensure your dessert is a hit!
- Bold Layering: Make sure to layer your ingredients evenly for a visually appealing look and balanced flavor.
- Chill Before Serving: Allow the cups to chill in the refrigerator for at least an hour before serving. This enhances the texture and flavor.
- Freshness Counts: Use fresh whipped topping for a light and airy texture, enhancing the overall taste of your dessert.
- Experiment with Flavors: Try different flavors of pudding like vanilla or butterscotch for unique variations of Dirt Cups.
- Use Quality Ingredients: Opt for high-quality Oreo cookies and gummy candies to elevate your dessert’s taste.
Best Side Dishes for Dirt Cups
While Dirt Cups are delightful on their own, pairing them with complementary side dishes can enhance your dessert experience. Here are some great options:
- Fruit Salad: A refreshing fruit salad balances the richness of Dirt Cups and adds healthy nutrients.
- Mini Cheesecakes: Individual mini cheesecakes provide a creamy contrast that pairs well with chocolate desserts.
- Chocolate-Covered Strawberries: These sweet treats add elegance and are easy to prepare, making them perfect alongside Dirt Cups.
- Vanilla Ice Cream: A scoop of vanilla ice cream offers a classic pairing with chocolate desserts that everyone loves.
- Brownie Bites: Rich brownie bites complement the flavors of Dirt Cups while adding extra chocolate goodness.
- Cookie Platter: Serve an assortment of cookies as a fun snack option that pairs well with the creamy texture of Dirt Cups.
- Caramel Popcorn: Sweet caramel popcorn brings crunch and sweetness, making it a delightful side dish choice.
- Nut Mix: A savory nut mix adds contrast and provides a crunchy element alongside your sweet dessert.
These side dishes will make your treat table even more inviting! Enjoy creating memorable moments with your delicious Dirt Cups!
Common Mistakes to Avoid
To create the perfect Dirt Cups, avoid these common pitfalls.
- Skipping the Thicking Time: Allowing the pudding to sit for 5 minutes is crucial for proper consistency. Skipping this step can lead to a runnier texture.
- Overmixing the Whipped Topping: When folding in whipped topping, do it gently. Overmixing can deflate the lightness and creaminess you want in your Dirt Cups.
- Using Warm Milk: Always use cold milk when preparing the pudding mix. Warm milk can prevent it from thickening properly.
- Uneven Layering: Take care to layer the pudding and crushed Oreos evenly in each cup. This ensures every spoonful has a balance of flavors and textures.
- Not Chilling Before Serving: Letting your Dirt Cups chill in the fridge is essential. Serving them warm or immediately after preparation can compromise their taste and texture.

Storage & Reheating Instructions
Refrigerator Storage
- Store your Dirt Cups in an airtight container to keep them fresh.
- They can be kept in the refrigerator for up to 3 days.
Freezing Dirt Cups
- While it’s not recommended for best texture, you can freeze individual portions.
- Use freezer-safe containers, and consume within 2 months for optimal quality.
Reheating Dirt Cups
- Oven: Not recommended, as it may alter the texture of the pudding.
- Microwave: Heat gently for a few seconds if necessary; be cautious not to overheat.
- Stovetop: Again, not advised; it’s best served chilled.
Frequently Asked Questions
Here are some common questions about making Dirt Cups.
What are Dirt Cups?
Dirt Cups are a fun dessert made with layers of chocolate pudding, crushed Oreos, and gummy candies.
How long do Dirt Cups last?
Properly stored in the refrigerator, Dirt Cups will last for about 3 days.
Can I customize my Dirt Cups?
Absolutely! You can add different toppings like sprinkles or use various flavors of pudding.
Are there any alternatives for allergies?
Yes! You can substitute dairy products with non-dairy alternatives and ensure all ingredients are allergy-friendly.
What occasions are best for serving Dirt Cups?
Dirt Cups are perfect for kids’ parties, Halloween celebrations, or any casual gathering where fun desserts are appreciated.
Final Thoughts
Dirt Cups are a delightful treat that combines fun with flavor. Their easy preparation makes them an excellent choice for gatherings or just a sweet indulgence at home. Feel free to customize them with different toppings or flavors to suit your taste!
Did You Enjoy Making This Recipe? Please rate this recipe with ⭐⭐⭐⭐⭐ or leave a comment.
📖 Recipe Card
Print
Dirt Cups
- Total Time: 0 hours
- Yield: Serves 8
Description
Dirt Cups are a whimsical dessert that brings joy to both kids and adults alike. With layers of rich chocolate pudding, crunchy crushed Oreo cookies, and colorful pectin-based gummy candies, these no-bake treats are perfect for any occasion. Whether it’s a birthday party, Halloween celebration, or just a fun family activity, Dirt Cups offer a delightful combination of textures and flavors that will brighten up your dessert table. Best of all, they’re quick to prepare and require minimal effort. Get ready to impress your guests with this easy and delicious dessert that encourages creativity and customization!
Ingredients
- 3.4 ounces instant chocolate pudding mix
- 2 cups milk
- 8 ounces whipped topping (thawed)
- 10–12 Oreo cookies (crushed)
- 32 pectin-based gummy candies
Instructions
- In a medium bowl, combine cold milk with the pudding mix. Whisk until well blended.
- Allow the mixture to sit for 5 minutes to thicken before gently folding in the whipped topping.
- Spoon the pudding into serving cups and layer crushed Oreo cookies on top. Finish with pectin-based gummy candies.
- Chill in the refrigerator until ready to serve for optimal flavor and texture.
- Prep Time: 10 minutes
- Cook Time: None
- Category: Dessert
- Method: No-Bake
- Cuisine: American
Nutrition
- Serving Size: 1 serving
- Calories: 320
- Sugar: 27g
- Sodium: 150mg
- Fat: 15g
- Saturated Fat: 7g
- Unsaturated Fat: 8g
- Trans Fat: 0g
- Carbohydrates: 44g
- Fiber: 2g
- Protein: 4g
- Cholesterol: 10mg