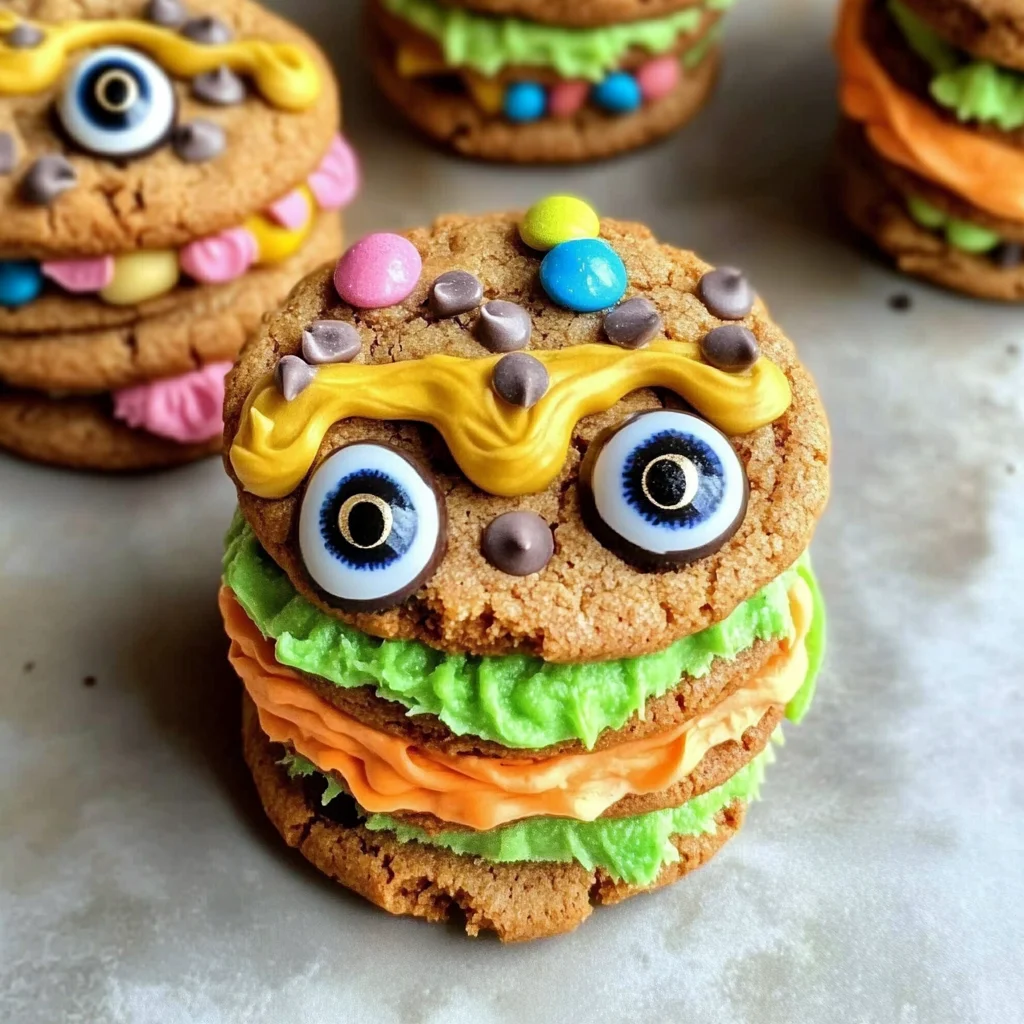
Monster Cookie Sandwiches are a delightful and colorful treat perfect for Halloween parties or fun family gatherings. These whimsical cookies feature creamy frosting and playful candy eyes, making them an eye-catching dessert that everyone will love. Easy to make and customizable with various colors, Monster Cookie Sandwiches bring joy and creativity to any occasion.

Jump to:
- Why You’ll Love This Recipe
- Tools and Preparation
- Essential Tools and Equipment
- Importance of Each Tool
- Ingredients
- For the Cookies
- For the Frosting
- How to Make Monster Cookie Sandwiches
- Step 1: Make the Frosting
- Step 2: Color the Frosting
- Step 3: Prepare Piping Bags (Optional)
- Step 4: Assemble the Cookie Sandwiches
- Step 5: Add Candy Eyes
- Step 6: Let Set & Store
- How to Serve Monster Cookie Sandwiches
- Creative Serving Suggestions
- How to Perfect Monster Cookie Sandwiches
- Best Side Dishes for Monster Cookie Sandwiches
- Common Mistakes to Avoid
- Storage & Reheating Instructions
- Refrigerator Storage
- Freezing Monster Cookie Sandwiches
- Reheating Monster Cookie Sandwiches
- Frequently Asked Questions
- How do I customize my Monster Cookie Sandwiches?
- Can I make these Monster Cookie Sandwiches ahead of time?
- What is the best way to store leftover Monster Cookie Sandwiches?
- Are Monster Cookie Sandwiches suitable for parties?
- Final Thoughts
- 📖 Recipe Card
Why You’ll Love This Recipe
- Fun Presentation: The addition of candy eyes makes these sandwiches visually appealing, perfect for kids and adults alike.
- Easy to Customize: You can change the frosting colors and use different cookie types to match your theme or preferences.
- Quick Preparation: With simple ingredients and steps, you can whip up these treats in no time.
- Perfect for Sharing: This recipe yields 18–20 sandwiches, making it ideal for parties or family gatherings.
- No Special Equipment Needed: Most of the tools required are common kitchen items, so you can get started right away.
Tools and Preparation
Before diving into the recipe, gather your essential tools to make the process smooth and enjoyable.
Essential Tools and Equipment
- Mixing bowl
- Electric mixer or whisk
- Piping bags (optional)
- Spatula
Importance of Each Tool
- Mixing bowl: A sturdy mixing bowl is crucial for combining ingredients without spills.
- Electric mixer or whisk: Using an electric mixer saves time when beating butter and sugar to a fluffy consistency.
- Piping bags (optional): These help in decorating with precision, allowing you to create fun designs with the frosting.

Ingredients
Perfect for Halloween Parties or Fun Family Treats!
🛒 Ingredients
(Makes 18–20 sandwiches)
For the Cookies
- 36–40 Chips Ahoy cookies (for 18–20 sandwich pairs)
For the Frosting
- 1 cup (2 sticks) unsalted butter, softened
- 4 cups powdered sugar
- 2–3 tablespoons milk or heavy cream
- 2 teaspoons vanilla extract
- Food coloring (Halloween colors like orange, green, purple, etc.)
- Candy eyes (variety of sizes if desired)
How to Make Monster Cookie Sandwiches
Step 1: Make the Frosting
In a medium bowl, beat the softened butter and powdered sugar together until well combined. Add vanilla extract along with 2–3 tablespoons of milk or cream. Continue beating until the mixture becomes light and fluffy.
Step 2: Color the Frosting
Divide your frosting into separate bowls based on how many colors you’d like. Add food coloring to each bowl, mixing until you achieve vibrant hues that capture the spirit of Halloween.
Step 3: Prepare Piping Bags (Optional)
Spoon your colored frosting into piping bags. If you don’t have piping bags, you can simply use a zip-top bag with one corner snipped off.
Step 4: Assemble the Cookie Sandwiches
Pair up cookies based on their size and shape. Flip one cookie upside down from each pair. Pipe or spread a generous dollop of frosting onto the flat side of this cookie. Top with the second cookie to create a sandwich.
Step 5: Add Candy Eyes
While the frosting is still soft, gently press candy eyes into the sides of each sandwich so they peek out like monster eyes. Feel free to be creative with how many eyes you add!
Step 6: Let Set & Store
Allow your assembled sandwiches to sit until the frosting firms up slightly. If you’re not serving them right away, store them in an airtight container in the fridge for up to 1–2 days. Enjoy your delightful Monster Cookie Sandwiches!
How to Serve Monster Cookie Sandwiches
Monster Cookie Sandwiches are a fun and delicious treat perfect for sharing at parties or family gatherings. Here are some creative ways to serve these delightful cookies.
Creative Serving Suggestions
Monster Themed Platter: Arrange the sandwiches on a spooky platter, adding Halloween-themed decorations like mini pumpkins or cobwebs for an extra festive touch.
Individual Treat Bags: Package each sandwich in clear treat bags tied with colorful ribbons. This makes it easy for guests to grab their own and adds a personal touch.
Cookie Decorating Station: Set up a decorating station where guests can add their own candy eyes and sprinkles to the sandwiches, allowing for customization and creativity.
Accompanying Drinks: Serve with fun drinks like colorful fruit punches or themed mocktails to enhance the festive atmosphere.
Creative Presentation: Stack the sandwiches vertically on a tiered cake stand for an eye-catching display that showcases your Monster Cookie Sandwiches beautifully.
How to Perfect Monster Cookie Sandwiches
To make sure your Monster Cookie Sandwiches turn out perfectly every time, follow these helpful tips.
Bold Butter: Ensure your butter is softened before mixing. This helps create a smooth and fluffy frosting that spreads easily.
Bold Color Mixing: When adding food coloring, start with a small amount and gradually increase until you achieve your desired shade. This prevents over-coloring and keeps the frosting vibrant.
Bold Cookie Pairing: Choose cookies of similar sizes for even sandwiches. This not only looks better but also ensures balanced bites.
Bold Frosting Application: Use a piping bag to apply frosting for cleaner edges and more control over the amount used, making your sandwiches visually appealing.
Best Side Dishes for Monster Cookie Sandwiches
Pair your Monster Cookie Sandwiches with fun side dishes that complement their sweetness. Here are some great options:
Fruit Skewers: Colorful fruit skewers made with seasonal fruits add freshness and balance to the sweet treats.
Veggie Platter: A crunchy veggie platter with dips provides a savory contrast to the sweetness of the sandwiches.
Popcorn Mix: Create a Halloween-themed popcorn mix with candy corn, nuts, and chocolate for an exciting snack.
Cheese Cubes: Offering cheese cubes adds a salty element that pairs well with sweet cookies, making for diverse flavor experiences.
Mini Cupcakes: Serve bite-sized cupcakes topped with colorful frosting as an additional sweet treat that matches the festive theme.
Trail Mix: A homemade trail mix featuring nuts, seeds, dried fruits, and chocolate bits creates a crunchy side that complements the softness of cookie sandwiches.
Common Mistakes to Avoid
Making Monster Cookie Sandwiches can be a fun experience, but there are common pitfalls to watch out for.
- Not Softening the Butter: Using cold butter can make it difficult to achieve a smooth and fluffy frosting. Always soften the butter at room temperature before mixing.
- Overmixing the Frosting: While you want a light and fluffy texture, overmixing can lead to a runny consistency. Beat just until combined for the best results.
- Ignoring Cookie Size: Pairing cookies that are too different in size can lead to uneven sandwiches. Always match similar-sized cookies for balanced sandwiches.
- Not Letting Frosting Set: If you serve right away, the frosting may not hold up well. Allow it to set in the fridge for a little while before serving for better results.
- Using Too Much Food Coloring: Adding too much coloring can alter the frosting’s texture. Start with a small amount and gradually add more until you achieve your desired color.
Storage & Reheating Instructions
Refrigerator Storage
- Store cookies in an airtight container to maintain freshness.
- They will last up to 2 days in the refrigerator.
Freezing Monster Cookie Sandwiches
- For extended storage, freeze individual sandwiches wrapped tightly in plastic wrap or placed in a freezer-safe container.
- They can be frozen for up to 3 months.
Reheating Monster Cookie Sandwiches
- Oven: Preheat your oven to 350°F (175°C) and warm sandwiches for about 5-7 minutes until soft.
- Microwave: Heat each sandwich individually on a microwave-safe plate for about 10-15 seconds for a soft treat.
- Stovetop: Place the cookie sandwich in a skillet over low heat, covered, for about 1-2 minutes to warm through.
Frequently Asked Questions
Here are some common questions about Monster Cookie Sandwiches.
How do I customize my Monster Cookie Sandwiches?
You can customize these sandwiches by adding various candies or sprinkles into the frosting mixture or swapping out the cookie type.
Can I make these Monster Cookie Sandwiches ahead of time?
Yes! You can prepare them a day in advance and store them in the refrigerator until you are ready to serve.
What is the best way to store leftover Monster Cookie Sandwiches?
Store leftovers in an airtight container in the refrigerator for up to two days or freeze them for longer storage options.
Are Monster Cookie Sandwiches suitable for parties?
Absolutely! They are perfect for Halloween parties and any fun family gatherings, offering both visual appeal and delicious taste.
Final Thoughts
Monster Cookie Sandwiches are not only fun to make but also versatile treats that everyone will love. Feel free to customize them with your favorite colors and toppings! Give this recipe a try at your next gathering; they’re sure to be a hit!
Did You Enjoy Making This Recipe? Please rate this recipe with ⭐⭐⭐⭐⭐ or leave a comment.
📖 Recipe Card
Print
Monster Cookie Sandwiches
- Total Time: 30 minutes
- Yield: Approximately 18–20 sandwiches 1x
Description
Monster Cookie Sandwiches are a delightful treat that adds a playful twist to any gathering, especially during Halloween. These colorful cookies combine crispy cookie pairs with creamy frosting and whimsical candy eyes, making them an eye-catching dessert that appeals to all ages. Not only are they easy to prepare, but they can also be customized with your favorite colors and toppings, allowing for creativity in the kitchen. Perfect for parties or fun family activities, these sandwich cookies promise to elevate the festive spirit while delivering delicious flavors.
Ingredients
- 36–40 Chips Ahoy cookies
- 1 cup (2 sticks) unsalted butter, softened
- 4 cups powdered sugar
- 2–3 tablespoons milk or heavy cream
- 2 teaspoons vanilla extract
- Food coloring (Halloween colors)
- Candy eyes
Instructions
- In a medium bowl, beat softened butter and powdered sugar together until well combined. Add vanilla extract and milk or cream; beat until the mixture is light and fluffy.
- Divide the frosting into separate bowls and add food coloring to create vibrant shades.
- If desired, spoon colored frosting into piping bags for easier decorating.
- Pair up cookies by size, flip one cookie upside down, and pipe or spread frosting on its flat side. Top with another cookie to create a sandwich.
- Press candy eyes into the frosting before it sets.
- Let the assembled sandwiches sit until the frosting firms up slightly, then store in an airtight container in the fridge.
- Prep Time: 20 minutes
- Cook Time: 10 minutes
- Category: Dessert
- Method: Baking
- Cuisine: American
Nutrition
- Serving Size: 1 sandwich
- Calories: 210
- Sugar: 18g
- Sodium: 95mg
- Fat: 9g
- Saturated Fat: 5g
- Unsaturated Fat: 3g
- Trans Fat: 0g
- Carbohydrates: 31g
- Fiber: 0g
- Protein: 1g
- Cholesterol: 15mg