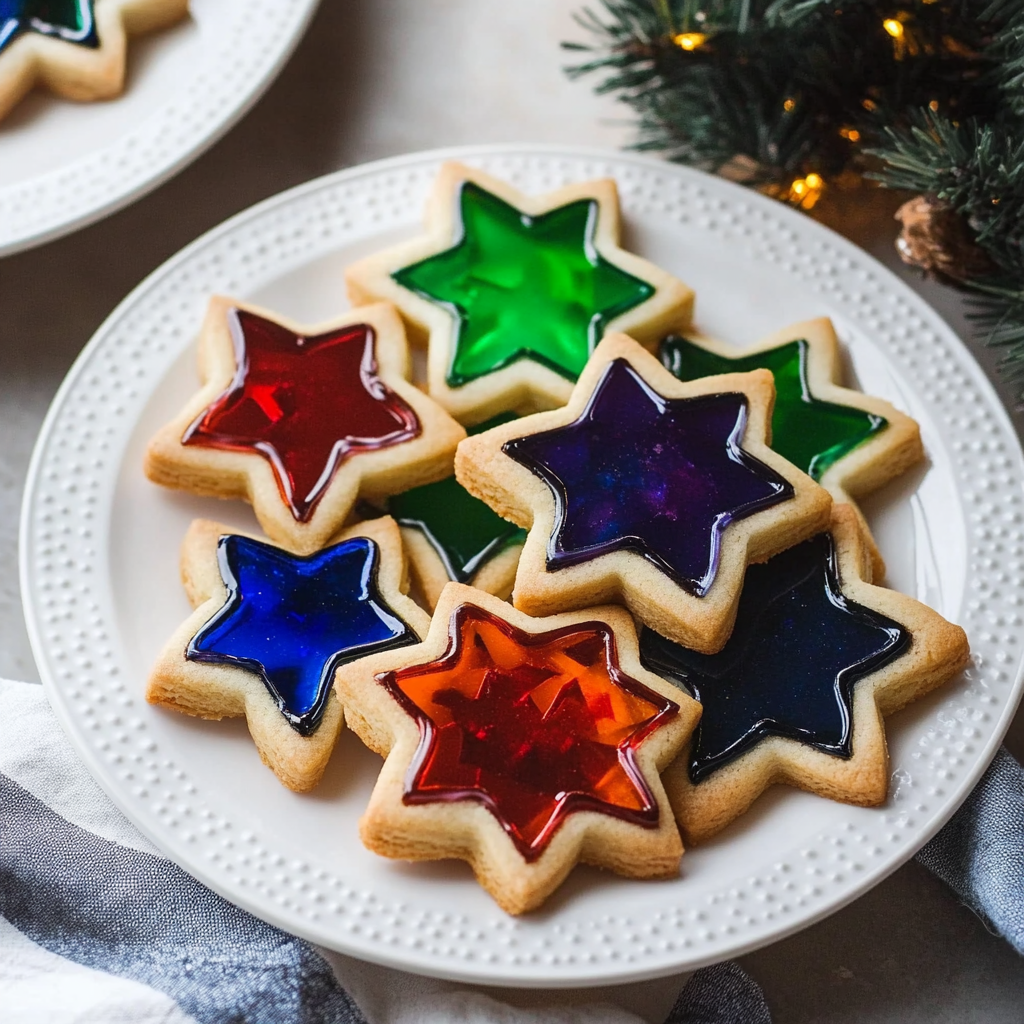
Stained Glass Cookies are a delightful treat that adds a burst of color and flavor to any occasion. This Stained Glass Cookies Recipe is perfect for festive celebrations, holiday gatherings, or just a fun baking day with the kids. The unique feature of these cookies is the vibrant candy center that looks like stained glass, making them not only delicious but visually stunning as well.

Jump to:
- Why You’ll Love This Recipe
- Tools and Preparation
- Essential Tools and Equipment
- Importance of Each Tool
- Ingredients
- For the Cookie Dough
- For the Stained Glass Center
- For Finishing Touches
- How to Make Stained Glass Cookies Recipe
- Step 1: Prepare the Oven and Baking Sheet
- Step 2: Mix Dry Ingredients
- Step 3: Cream Butter and Sugar
- Step 4: Combine Mixtures
- Step 5: Roll Out Dough
- Step 6: Create Candy Centers
- Step 7: Bake Cookies
- Step 8: Cool Down and Finish
- How to Serve Stained Glass Cookies Recipe
- Festive Cookie Platters
- Gift Boxes
- Hanging Ornaments
- Cookie Decorating Stations
- Accompanied by Hot Beverages
- How to Perfect Stained Glass Cookies Recipe
- Best Side Dishes for Stained Glass Cookies Recipe
- Common Mistakes to Avoid
- Storage & Reheating Instructions
- Refrigerator Storage
- Freezing Stained Glass Cookies Recipe
- Reheating Stained Glass Cookies Recipe
- Frequently Asked Questions
- Can I use different types of candies for Stained Glass Cookies?
- What should I do if my cookie dough is too crumbly?
- How do I make my Stained Glass Cookies more colorful?
- Can I decorate my Stained Glass Cookies?
- Final Thoughts
- 📖 Recipe Card
Why You’ll Love This Recipe
- Visually Stunning: The colorful candy melts create an eye-catching centerpiece that will impress guests.
- Easy to Make: Simple steps make this recipe accessible for bakers of all skill levels.
- Versatile Treat: Great for holidays, parties, or as a fun afternoon project with kids.
- Customizable Flavors: You can mix and match flavors using different extracts and candy types.
- Great for Gifting: These cookies are perfect for wrapping up as gifts or hanging as ornaments.
Tools and Preparation
Before you start baking, gather your tools and prepare your workspace to ensure a smooth process.
Essential Tools and Equipment
- Mixing bowl
- Electric mixer
- Cookie cutters
- Baking sheet
- Parchment paper
- Rolling pin
Importance of Each Tool
- Mixing bowl: A large bowl allows you to combine ingredients efficiently without spilling.
- Electric mixer: Makes creaming butter and sugar quick and easy, ensuring a fluffy texture in your dough.
Ingredients
For the Cookie Dough
- 2 ¾ cups all-purpose flour
- 1 teaspoon baking powder
- ¼ teaspoon salt
- 1 cup (2 sticks) unsalted butter, softened
- 1 cup granulated sugar
- 1 large egg
- 1 teaspoon vanilla extract (or almond extract for a twist)
- ½ teaspoon almond extract (optional)
For the Stained Glass Center
- Assorted hard candies (like Jolly Ranchers or Life Savers), separated by color and crushed
For Finishing Touches
- Powdered sugar (for dusting)
- Ribbon or string (if hanging as ornaments)
How to Make Stained Glass Cookies Recipe
Step 1: Prepare the Oven and Baking Sheet
Preheat your oven to 350°F (175°C). Line your baking sheets with parchment paper to prevent sticking.
Step 2: Mix Dry Ingredients
In a mixing bowl, combine the following:
1. In a separate bowl, whisk together 2 ¾ cups all-purpose flour, 1 teaspoon baking powder, and ¼ teaspoon salt. Set aside.
Step 3: Cream Butter and Sugar
- Using an electric mixer, cream together 1 cup unsalted butter and 1 cup granulated sugar until light and fluffy.
- Add in 1 large egg, 1 teaspoon vanilla extract, and optional ½ teaspoon almond extract. Mix until well combined.
Step 4: Combine Mixtures
Gradually add the dry mixture to the wet mixture until fully incorporated. The dough should be smooth.
Step 5: Roll Out Dough
On a floured surface, roll out the dough to about ¼ inch thickness. Use cookie cutters to cut shapes from the dough.
Step 6: Create Candy Centers
Use smaller cookie cutters or a knife to cut out shapes from the center of each cookie. Fill these holes with crushed candies before baking.
Step 7: Bake Cookies
Place cookies on the prepared baking sheets. Bake in preheated oven for about 8–10 minutes or until edges are lightly golden.
Step 8: Cool Down and Finish
Allow cookies to cool completely on wire racks. Dust with powdered sugar before serving or packaging them as gifts!
Enjoy your vibrant and tasty Stained Glass Cookies Recipe, perfect for sharing with friends and family!
How to Serve Stained Glass Cookies Recipe
Stained glass cookies are not only a delightful treat but also a beautiful addition to any festive gathering. These colorful cookies can be served in various ways to enhance their visual appeal and taste.
Festive Cookie Platters
- Arrange the cookies on a decorative platter for a stunning centerpiece at your holiday party. Mixing different shapes and colors will create an eye-catching display.
Gift Boxes
- Place the cookies in clear gift boxes tied with a ribbon for a charming homemade gift. This adds a personal touch that friends and family will appreciate.
Hanging Ornaments
- Use ribbon or string to hang the cookies as ornaments on your special occasion tree. This allows you to enjoy them as decoration before indulging in their sweetness.
Cookie Decorating Stations
- Set up a cookie decorating station during holiday gatherings. Provide icing, sprinkles, and other toppings so guests can personalize their stained glass cookies.
Accompanied by Hot Beverages
- Serve these cookies alongside hot chocolate or spiced tea. The warmth of the drinks complements the sweetness of the cookies, making for a cozy treat.
How to Perfect Stained Glass Cookies Recipe
To achieve the best results with your stained glass cookies, follow these helpful tips.
- Use softened butter: Ensure your butter is at room temperature for better mixing and texture. Cold butter can lead to tough cookies.
- Chill your dough: After mixing, chill the dough for at least an hour. This prevents spreading during baking and helps maintain shapes.
- Crush candies properly: Make sure to crush hard candies into small pieces for even melting. Larger chunks may not create the desired effect in the cookie.
- Monitor baking time: Keep an eye on your cookies while they bake. Overbaking can result in hard edges while underbaking may lead to uneven textures.
- Dust with powdered sugar: Before serving, lightly dust with powdered sugar for an elegant finish that enhances presentation.
Best Side Dishes for Stained Glass Cookies Recipe
Pairing side dishes with stained glass cookies can elevate your dessert table. Here are some delicious options:
- Fruit Salad: A refreshing mix of seasonal fruits complements the sweetness of the cookies while adding a healthy balance.
- Cheese Platter: Include assorted cheeses like brie and cheddar with crackers. The savory flavors contrast nicely with sweet treats.
- Chocolate Fondue: Set up a chocolate fondue station where guests can dip fruits or pretzels alongside their cookies for added indulgence.
- Mini Cupcakes: Offer mini-sized cupcakes in various flavors to provide variety without overwhelming guests’ palates.
- Spiced Nuts: Roasted spiced nuts add crunch and a hint of savory flavor that pairs well with sweet desserts.
- Yogurt Parfaits: Layer yogurt with granola and berries for a light option that balances out richer desserts like stained glass cookies.
- Ice Cream Sundae Bar: Create an ice cream sundae bar where guests can top their scoops with crushed stained glass cookie pieces for fun customization.
- Hot Chocolate Station: Serve warm hot chocolate with whipped cream and toppings as a cozy drink option alongside your festive cookies.
Common Mistakes to Avoid
When making stained glass cookies, it’s important to avoid common pitfalls that can affect your results.
- Ignoring the chilling step: Skipping the refrigeration of dough can lead to cookies that spread too much while baking. Always chill your dough for at least an hour.
- Overmixing the dough: Overmixing can result in tough cookies. Mix just until the ingredients are combined for a tender texture.
- Not crushing candies properly: Using large pieces of candy can cause uneven melting. Make sure to crush them into small, even pieces for a uniform appearance.
- Using the wrong oven temperature: Baking at a temperature that is too high or low can change the texture and color of your cookies. Use an oven thermometer to ensure accuracy.
- Neglecting to dust with powdered sugar: Forgetting this step can lead to cookies that appear dull and unappetizing. Dust your finished cookies lightly for a beautiful finish.
Storage & Reheating Instructions
Refrigerator Storage
- Store in an airtight container for up to a week.
- Place parchment paper between layers to prevent sticking.
Freezing Stained Glass Cookies Recipe
- Freeze cookies in a single layer on a baking sheet before transferring them to an airtight container.
- They can be stored in the freezer for up to three months.
Reheating Stained Glass Cookies Recipe
- Oven: Preheat to 350°F (175°C) and reheat for 5-7 minutes.
- Microwave: Heat one cookie at a time in short bursts of 10-15 seconds until warmed.
- Stovetop: Use a skillet on low heat, covering with a lid, and heat for about 2-3 minutes.
Frequently Asked Questions
Here are some common questions about the Stained Glass Cookies Recipe.
Can I use different types of candies for Stained Glass Cookies?
Yes, you can experiment with various hard candies like butterscotch or fruit-flavored ones for unique flavors and colors.
What should I do if my cookie dough is too crumbly?
If your dough crumbles, try adding a teaspoon of milk or water until it reaches a workable consistency.
How do I make my Stained Glass Cookies more colorful?
Using assorted colored candies will create vibrant stained glass effects. Be creative with your color choices!
Can I decorate my Stained Glass Cookies?
Absolutely! You can use icing or edible glitter after baking for extra decoration if desired.
Final Thoughts
Stained glass cookies are not just beautiful; they are also versatile and customizable. You can mix up flavors and colors based on personal preferences or seasonal themes. Try this delightful recipe today, and let your creativity shine through!
Did You Enjoy Making This Recipe? Please rate this recipe with ⭐⭐⭐⭐⭐ or leave a comment.
📖 Recipe Card
Print
Stained Glass Cookies
- Total Time: 40 minutes
- Yield: Approximately 24 cookies 1x
Description
Stained Glass Cookies are a delightful and colorful treat that brighten up any occasion. These vibrant cookies feature a stunning candy center that resembles stained glass, making them perfect for festive celebrations or fun baking days with family. Easy to make and highly customizable, they can be flavored with different extracts and filled with assorted hard candies. Whether you serve them at a holiday gathering, gift them in charming boxes, or use them as decorative ornaments, these cookies are sure to impress.
Ingredients
- 2 ¾ cups all-purpose flour
- 1 teaspoon baking powder
- ¼ teaspoon salt
- 1 cup unsalted butter, softened
- 1 cup granulated sugar
- 1 large egg
- 1 teaspoon vanilla extract
- Assorted hard candies (like Jolly Ranchers), crushed
Instructions
- Preheat the oven to 350°F (175°C) and line baking sheets with parchment paper.
- In a bowl, whisk together flour, baking powder, and salt; set aside.
- In another bowl, cream together butter and sugar until light and fluffy. Add the egg and vanilla extract, mixing well.
- Gradually add dry ingredients to the wet mixture until a smooth dough forms.
- Roll out the dough to ¼ inch thick on a floured surface and cut shapes using cookie cutters.
- Cut out smaller shapes from the centers of each cookie and fill with crushed candies.
- Bake for 8–10 minutes or until edges are lightly golden. Cool completely before serving.
- Prep Time: 30 minutes
- Cook Time: 10 minutes
- Category: Dessert
- Method: Baking
- Cuisine: American
Nutrition
- Serving Size: 1 cookie (30g)
- Calories: 120
- Sugar: 8g
- Sodium: 50mg
- Fat: 7g
- Saturated Fat: 4g
- Unsaturated Fat: 2g
- Trans Fat: 0g
- Carbohydrates: 13g
- Fiber: <1g
- Protein: <1g
- Cholesterol: 20mg