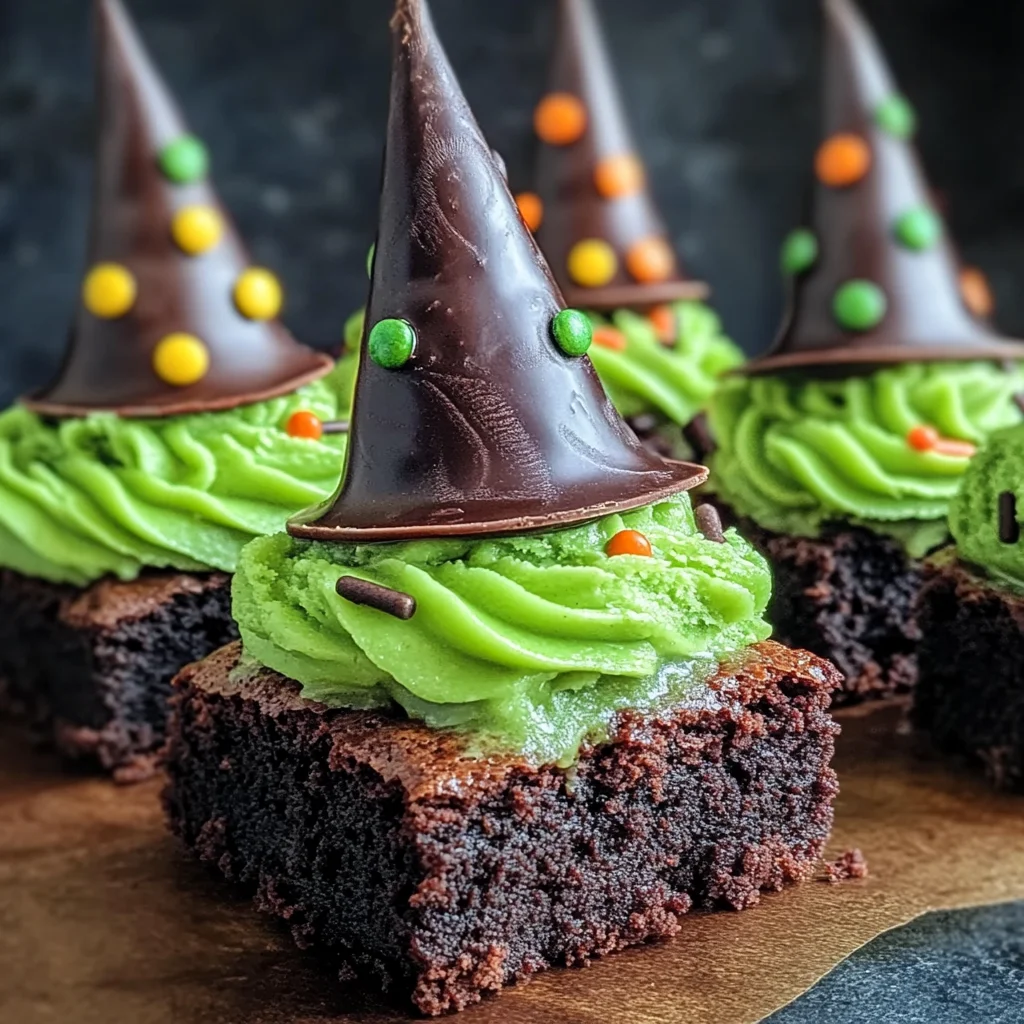
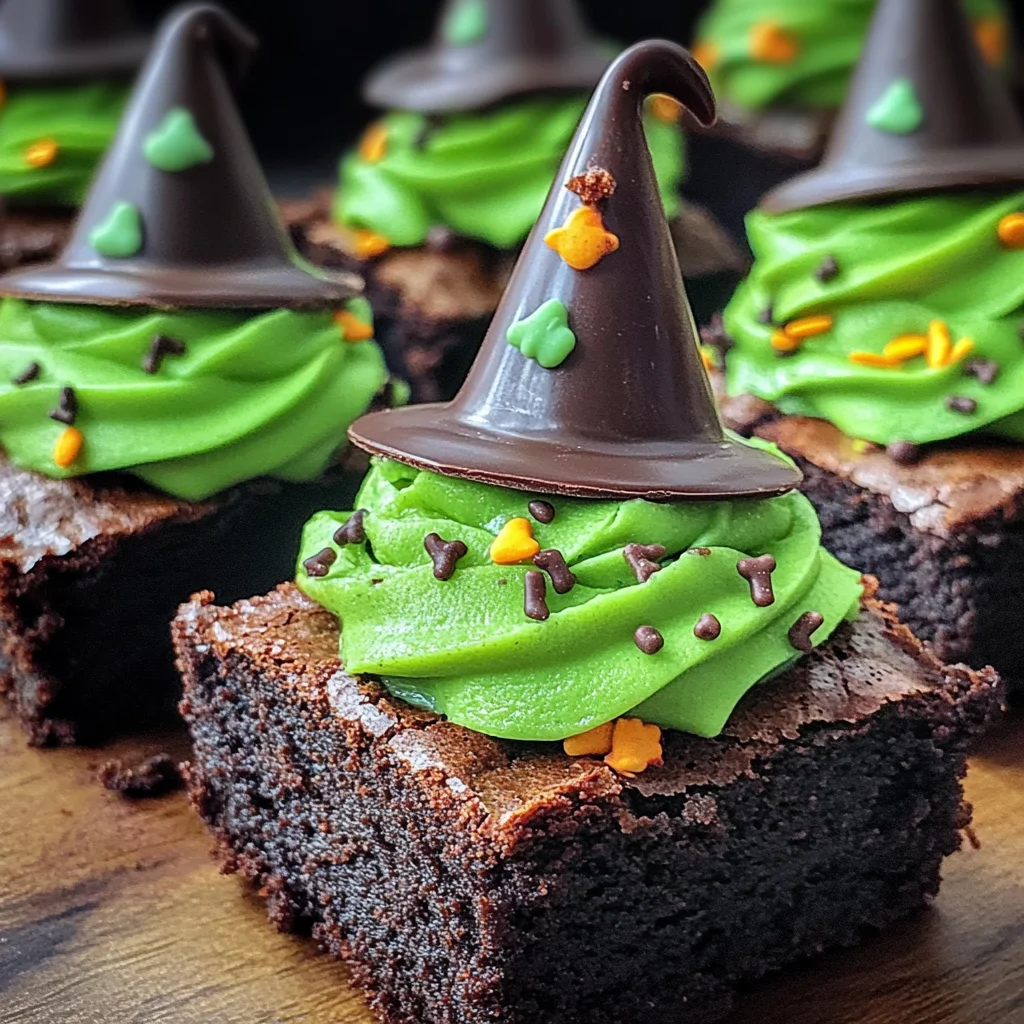
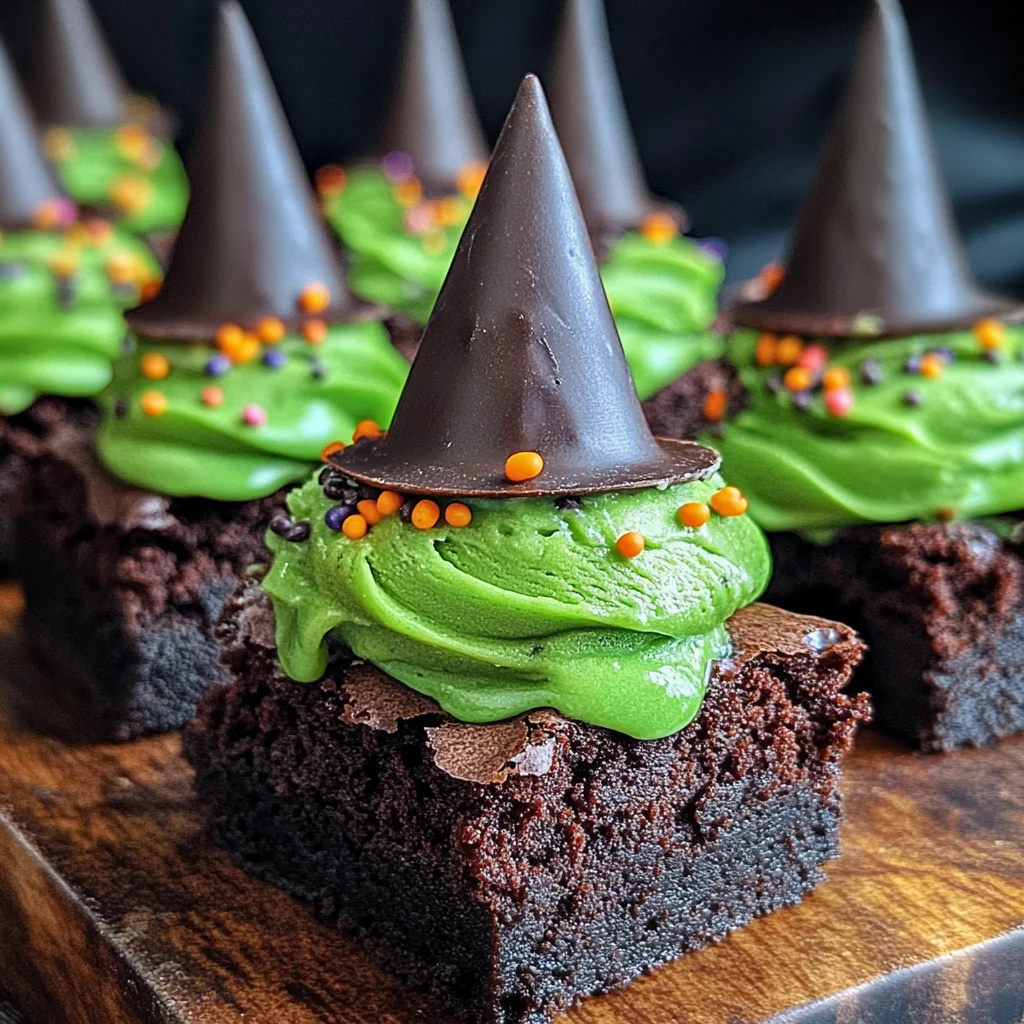
Wicked Witch Hat Brownies are the perfect blend of fun and flavor for your Halloween celebrations. These delightful treats feature rich, fudgy brownies topped with chocolate ice cream cones that resemble witch hats. With vibrant green frosting and festive sprinkles, they add a spooky touch to any gathering. Perfect for parties, school events, or just a fun family baking day, these brownies will surely enchant both kids and adults alike!
Jump to:
- Why You’ll Love This Recipe
- Tools and Preparation
- Essential Tools and Equipment
- Importance of Each Tool
- Ingredients
- For the Brownies
- For the Witch Hats
- For the Frosting
- How to Make Wicked Witch Hat Brownies
- Step 1: Prepare the Brownie Batter
- Step 2: Combine Dry Ingredients
- Step 3: Bake the Brownies
- Step 4: Cool Completely
- Step 5: Prepare the Witch Hats
- Step 6: Frost the Brownies
- Step 7: Assemble Your Treats
- How to Serve Wicked Witch Hat Brownies
- Individual Dessert Plates
- Brownie Towers
- Party Favors
- Ice Cream Pairing
- Themed Drink Accompaniment
- How to Perfect Wicked Witch Hat Brownies
- Best Side Dishes for Wicked Witch Hat Brownies
- Common Mistakes to Avoid
- Storage & Reheating Instructions
- Refrigerator Storage
- Freezing Wicked Witch Hat Brownies
- Reheating Wicked Witch Hat Brownies
- Frequently Asked Questions
- Can I use different flavors for the frosting?
- How do I make the brownies more fudgy?
- What if I can’t find chocolate ice cream cones?
- How do I store leftover Wicked Witch Hat Brownies?
- Can these be made ahead of time?
- Final Thoughts
- 📖 Recipe Card
Why You’ll Love This Recipe
- Creative Presentation: The unique witch hat design makes these brownies visually appealing and fun to eat.
- Deliciously Fudgy: Rich cocoa flavor combined with a moist brownie texture creates a decadent dessert experience.
- Easy to Prepare: With simple ingredients and straightforward steps, even beginner bakers can whip up this treat.
- Versatile Treat: Ideal for Halloween or any festive occasion where you want to impress guests with something special.
- Customizable Toppings: Feel free to get creative with different colors of frosting or various sprinkles to match your theme.
Tools and Preparation
Before diving into the recipe, gather the necessary tools for making Wicked Witch Hat Brownies. Having everything ready will make the process smoother and more enjoyable.
Essential Tools and Equipment
- Mixing bowls
- Whisk
- 9×13 inch baking pan
- Wire rack
- Spatula
- Piping bag (optional)
Importance of Each Tool
- Mixing bowls: Essential for combining wet and dry ingredients efficiently.
- Whisk: Helps incorporate air into your batter, leading to lighter brownies.
- Baking pan: A sturdy pan ensures even cooking throughout the brownie mix.
- Piping bag: Useful for decorating with frosting if you want precise control.
Ingredients
To create these delightful Wicked Witch Hat Brownies, gather the following ingredients:
For the Brownies
- 1 cup (225g) unsalted butter
- 2 cups (400g) granulated sugar
- 4 large eggs
- 1 teaspoon vanilla extract
- 1 cup (125g) all-purpose flour
- 1 cup (90g) unsweetened cocoa powder
- 1/2 teaspoon salt
- 1/2 teaspoon baking powder
For the Witch Hats
- 12 chocolate ice cream cones
For the Frosting
- 2 cups (300g) powdered sugar
- 1/4 cup (60ml) milk
- 1 teaspoon vanilla extract (for frosting)
- Green food coloring
- Halloween-themed sprinkles
How to Make Wicked Witch Hat Brownies
Step 1: Prepare the Brownie Batter
Begin by melting the unsalted butter in a saucepan over low heat. Once melted, combine it with granulated sugar in a mixing bowl.
1. Add in the eggs one at a time, mixing well after each addition.
2. Stir in the vanilla extract until fully incorporated.
Step 2: Combine Dry Ingredients
In another bowl, whisk together:
– All-purpose flour,
– Unsweetened cocoa powder,
– Salt,
– Baking powder.
Slowly add this dry mixture to your wet ingredients until just combined—avoid overmixing.
Step 3: Bake the Brownies
Pour the brownie batter into a prepared 9×13 inch baking pan.
– Spread it evenly using a spatula.
– Bake at 350°F (175°C) for about 25-30 minutes or until a toothpick inserted comes out clean.
Step 4: Cool Completely
Allow the brownies to cool completely in the pan on a wire rack before decorating.
Step 5: Prepare the Witch Hats
Optionally, you can dip the tops of each chocolate ice cream cone into melted chocolate and then into sprinkles for extra flair.
Step 6: Frost the Brownies
In a mixing bowl, combine:
– Powdered sugar,
– Milk,
– Vanilla extract,
– Green food coloring.
Mix until smooth and spreadable. Frost each cooled brownie generously.
Step 7: Assemble Your Treats
Place an upside-down chocolate ice cream cone on top of each frosted brownie. Finish by decorating with Halloween-themed sprinkles for that extra festive touch!
How to Serve Wicked Witch Hat Brownies
Wicked Witch Hat Brownies are perfect for Halloween parties or spooky gatherings. These delightful treats can be presented in various creative ways to enhance their festive charm.
Individual Dessert Plates
- Serve each brownie on a decorative dessert plate with themed napkins. This adds a personal touch that guests will appreciate.
Brownie Towers
- Stack several brownies on a cake stand to create a fun tower of treats. Drizzle extra frosting and sprinkle additional Halloween-themed decorations for visual appeal.
Party Favors
- Package individual brownies in clear bags tied with black or orange ribbon. This makes a great take-home treat for your guests to enjoy later.
Ice Cream Pairing
- Offer a scoop of vanilla or mint ice cream on the side for an indulgent combination that complements the rich chocolate flavor.
Themed Drink Accompaniment
- Pair these brownies with spooky-themed drinks like green punch or hot apple cider, enhancing the overall Halloween experience.
How to Perfect Wicked Witch Hat Brownies
Creating the best Wicked Witch Hat Brownies requires attention to detail. Here are some tips to ensure they come out perfectly every time.
- Use quality ingredients: High-quality cocoa powder and butter make a significant difference in flavor and texture.
- Don’t overmix: Mix the wet and dry ingredients just until combined to maintain the fudgy texture of the brownies.
- Check for doneness: Use a toothpick inserted into the center; it should come out with moist crumbs, not clean.
- Cool completely: Allow brownies to cool fully before frosting; this prevents melting and ensures neat decoration.
- Experiment with frostings: While green frosting is fun, consider trying different colors or flavors for variety.
- Store properly: Keep any leftover brownies in an airtight container at room temperature for up to three days for optimal freshness.
Best Side Dishes for Wicked Witch Hat Brownies
To balance the sweetness of Wicked Witch Hat Brownies, consider serving them alongside these delicious side dishes that complement their rich flavor.
- Fruit Salad: A mix of seasonal fruits provides freshness and balances the sweetness of the brownies.
- Cheese Platter: An assortment of cheeses can offer savory contrast, making your dessert table more appealing.
- Popcorn Mix: Create a spooky popcorn mix with dark chocolate drizzle and candy corn for a crunchy side option.
- Spooky Veggies: Serve carrot sticks and celery with green dip resembling witch’s brew; it’s healthy and fun!
- Mini Pumpkin Pies: Individual pumpkin pies add another layer of seasonal flavor that pairs well with chocolate.
- Chocolate-Covered Pretzels: Sweet-and-salty chocolate-covered pretzels provide an addictive snack alongside your dessert.
- Nut Mix: A spiced nut mix can offer a crunchy texture that contrasts nicely with the soft brownies.
- Cinnamon Rolls: For an indulgent twist, serve warm cinnamon rolls as an unexpected but delightful addition.
Common Mistakes to Avoid
When making Wicked Witch Hat Brownies, it’s important to steer clear of some common pitfalls. Here are a few mistakes to watch out for:
Bold mixing techniques: Not mixing the batter enough can lead to uneven brownies. Ensure you combine wet and dry ingredients until just mixed for the best texture.
Bold incorrect baking time: Overbaking or underbaking can ruin your brownies. Keep an eye on the timer and use a toothpick to check for doneness; it should come out with a few moist crumbs.
Bold forgetting to cool: Frosting warm brownies will cause the frosting to melt. Allow your brownies to cool completely before adding toppings for a beautiful finish.
Bold neglecting decoration: Skipping sprinkles or creative touches can make your treats less festive. Don’t forget to add Halloween-themed sprinkles for that spooky flair!
Bold misplacing cones: Placing cones too early can result in them sinking into the brownie. Wait until the brownies are completely cooled before adding your witch hats!
Storage & Reheating Instructions
Refrigerator Storage
- Store in an airtight container.
- Best consumed within 3-5 days.
Freezing Wicked Witch Hat Brownies
- Wrap individual brownies in plastic wrap.
- Place in a freezer-safe bag or container; they can last up to 3 months.
Reheating Wicked Witch Hat Brownies
- Oven: Preheat to 350°F (175°C) and heat for about 10 minutes.
- Microwave: Heat one brownie at a time on medium power for about 20-30 seconds.
- Stovetop: Place in a skillet over low heat, covering with a lid, and warm for about 5-7 minutes.
Frequently Asked Questions
Here are some common questions about Wicked Witch Hat Brownies that may help you in your baking journey.
Can I use different flavors for the frosting?
You can absolutely customize the frosting! Try using chocolate or even vanilla frosting instead of green.
How do I make the brownies more fudgy?
For fudgier brownies, consider reducing the flour slightly or adding an extra egg. This will enhance moisture and richness.
What if I can’t find chocolate ice cream cones?
You can substitute with regular cones or even store-bought waffle cones. Just ensure they fit well on top of your brownies!
How do I store leftover Wicked Witch Hat Brownies?
Follow our storage instructions above! They stay fresh in an airtight container in the fridge or freezer.
Can these be made ahead of time?
Yes, these brownies are great for making ahead! You can bake them up to two days prior and frost them just before serving.
Final Thoughts
Wicked Witch Hat Brownies are not only delightful but also versatile enough for various occasions beyond Halloween. Feel free to experiment with colors and decorations that suit your theme. Enjoy crafting these festive treats with family and friends!
Did You Enjoy Making This Recipe? Please rate this recipe with ⭐⭐⭐⭐⭐ or leave a comment.
📖 Recipe Card
Print
Wicked Witch Hat Brownies
- Total Time: 45 minutes
- Yield: Approximately 12 servings 1x
Description
Wicked Witch Hat Brownies are a delightful treat that combines both fun and flavor, making them a must-have for your Halloween celebrations. These fudgy brownies are topped with chocolate ice cream cones, transformed into witch hats with vibrant green frosting and playful sprinkles. Perfect for parties, school events, or a family baking day, these enchanting desserts are sure to be a hit among kids and adults alike. With simple ingredients and easy preparation, you can create these festive treats in no time!
Ingredients
- 1 cup (225g) unsalted butter
- 2 cups (400g) granulated sugar
- 4 large eggs
- 1 teaspoon vanilla extract
- 1 cup (125g) all-purpose flour
- 1 cup (90g) unsweetened cocoa powder
- 1/2 teaspoon salt
- 1/2 teaspoon baking powder
- 12 chocolate ice cream cones
- 2 cups (300g) powdered sugar
- 1/4 cup (60ml) milk
- 1 teaspoon vanilla extract (for frosting)
- Green food coloring
- Halloween-themed sprinkles
Instructions
- Preheat your oven to 350°F (175°C) and prepare a 9×13 inch baking pan.
- Melt the unsalted butter and mix it with granulated sugar in a bowl. Add eggs one at a time and stir in vanilla extract.
- In another bowl, whisk together flour, cocoa powder, salt, and baking powder. Gradually combine with the wet ingredients until just mixed.
- Pour the brownie batter into the prepared pan and bake for 25-30 minutes or until a toothpick comes out clean.
- Let brownies cool completely before frosting with a mixture of powdered sugar, milk, vanilla extract, and green food coloring.
- Place an upside-down chocolate cone on each frosted brownie and decorate with sprinkles.
- Prep Time: 15 minutes
- Cook Time: 30 minutes
- Category: Dessert
- Method: Baking
- Cuisine: American
Nutrition
- Serving Size: 1 brownie (85g)
- Calories: 350
- Sugar: 28g
- Sodium: 160mg
- Fat: 17g
- Saturated Fat: 10g
- Unsaturated Fat: 6g
- Trans Fat: 0g
- Carbohydrates: 47g
- Fiber: 2g
- Protein: 4g
- Cholesterol: 80mg